Showing posts with label virtual. Show all posts

02 August 2011

How to Virtualize OS X Lion on Windows

Update: Fixed down hard drive files (February 8, 2012).

Sorry about the delay guys, this page has been updated so that Xcode 4.1 does not crash anymore. (August 17, 2011).

If you've tried to virtualize previous versions of OS X, you know that it is a very tedious and time consuming process. This new guide works by giving you a simple VMWare Image. This means that the OS has already been pre-configured on a hard drive. For the most part, there is no need to mess around with boot flags or installation settings

This guide will show how to setup a fully working OS X Lion 10.7 on a Windows machine. This process will take about an hour but most of the time is spent downloading files. This was done on Windows 7 but should work on any OS as long as it meets the requirements.

Requirements
A laptop or desktop computer that supports virtualization (most newer computers do).
At least 1 GB of RAM (the more, the better).
VMWare Workstation (this is a paid program but a little research will get you it for free).
VMWare Hard Drive (vmx files, it is in a self-extracting .exe file)
OS X Lion (VMDK File)

Instructions

Before you start, make sure that you have enabled Virtualization in the BIOS of your computer. This is usually disabled by default by computer manufacturers.

An updated video has been made of all the new steps:


1. From the file downloaded, double click on Mac OS X Lion VMware Files.exe. Click Run then Yes. This will decompress the files.


2. Once done, a folder named Mac OS X Lion VMware Files will appear, double click it.


3. You will need to follow the instructions in this video to unlock VMWare. Instead of using the files from the video, use the files from Step 2.


4. From Step 1, you should have also gotten a folder named Mac OS X Lion. Open that up and open the file named Mac OS X Lion.vmx. Double-click this file. It will open in VMWare Workstation.


5. On the left column, click on Edit Virtual Machine Settings. In the Memory tab, you can edit how much RAM OS X will get. In the Sound tab, change to Specify host sound card, change it to your sound card. After the machine has started and sound doesn't work, change to Use default host sound card.


6.  At the bottom of the box is an Add button, click it. Select Hard Disk from the left, click Next. Choose Use and existing virtual disk.


7. Browse for the Mac OS X Lion Installer.vmdk that was downloaded from the torrent. Click Finish. Click OK to close the box.


8. On the left column, click Power on this virtual machine.


9. If a box asks to repair the image, click Repair. Once the box comes up, click I copied it, click OK. A message about the CD Drive may come up, just click OK.


10. The machine should power up in a few moments, ready to go. For ease of use, click in VMWare Workstation, click File > Add to Favorites.

11. You should now have a Install Mac OS X screen. At the top, click Utilities then Disk Utility. Select the 42.45 GB Hard Disk. Click on the Erase tab. Now you can name your hard drive what you want. Then click on Erase. Click Erase again.


12. Once the process is done, close out of the Disk Utility box, the Install screen will come back up. Click Continue, Agree. Select the 40GB Hard Disk to install Lion. Click Install. The process will take about 30 minutes. Once it's done, the account setup will start. Once that's done, Lion will start.

13. To be able to use the machine in full screen, in OS X open Preferences, click on Displays. Now select the resolution of your monitor. Now in VMWare, click on the Full Screen button on the toolbar (10th button from the left).


14. Now you're done, you can use this OS as a normal to install programs.

16 April 2011

Updating Virtualized OS X (10.6.7)

A virtual machine virtualized with VMWare Player on OS X can't be updated using the regular update method in OS X. This is the special set of instructions to update your vitual machine. The guide will be constantly updated to the latest version of OS X.

1. In Windows, download the 10.6.7 update from here: http://support.apple.com/kb/DL1361.

2. Also, download this new kernel: http://blog.nawcom.com/?p=640.

3. Now follow these instructions to update to OS X Snow Leopard 10.6.7. This software update is required for the SDK and can not be manually installed through the Apple updater in the OS.

Though the video shows the steps for 10.6.5, the steps are exactly the same.


27 February 2011

Change Resolution and Enable Sound on VMware System

When you first install a virtualized OS X on your machine, the resolution may not fit the entire screen. Also, OS X normally does not output sound.

This guide will show you how to change that to run OS X at your native screen resolution and enable sound.

Downloads

Snowy_VM.zip (you may have already downloaded this from a previous guide, if so, it isn't necessary to download again).

Instructions

1. Open your Virtual Machine. On the blue VMware bar, press Virtual Machine > Virtual Machine Settings > CD/DVD > Settings.


2. On the right, make sure the check boxes under Device status are clicked (Connected and Connect at power on.) Click OK.


3. In a few moments, a new icon should appear on your desktop named VMware Tools. Double-click it. Click on Install VMware Tools.


4. Keep pressing Continue, then press Install. Enter your password if you are asked. Press Continue, then wait for it to finish installing.

5. On the blue VMware bar, press Virtual Machine > Virtual Machine Settings > CD/DVD > Settings. At the top right, change the tab to Options. Under Folder sharing, click Enabled until next power off or suspend.


6. Click Add at the bottom of the window. Browse to the Snowy_VM folder (make sure you've unzipped it). Click OK, Next, and then Finish.


7. In a moment, an icon named VMware Shared Folders will show up on your desktop. Double click it, double-click the Snowy_VM folder that opened up. Double-click EnsoniqAudioPCI.mpkg.


8. Click continue twice, then check both boxes for AppleAC97Audio with EnsoniqAudi... and EnsoniqAudioPCI Plugin. Click Continue then Install.


9. Once finished, double-click the blue VMware bar to go into full screen mode.


The virtual machine should now cover your entire screen and sound should now work. You may need to restart your virtual machine to get it working.

28 December 2010

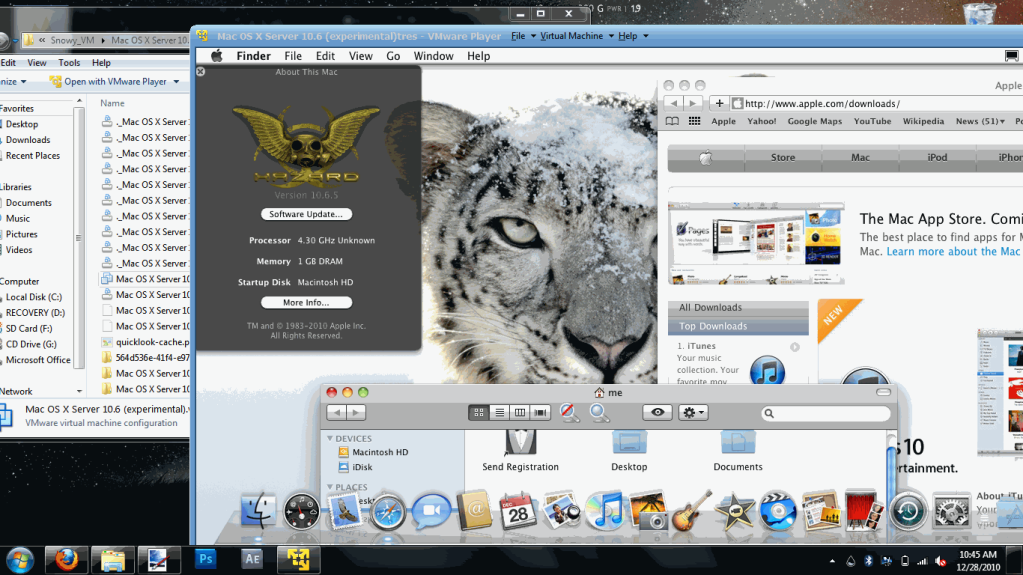
How to Virtualize OS X 10.6 on Windows

IMPORTANT: This guide is now outdated, a new, easier guide has been written on how to install OS X 10.7 Lion. Click here to go to it.


With newer computers, it is now possible to run two Operating Systems at once, one running inside of another. This guide will describe the process of running Mac OS X 10.6.2 on a machine already running Windows 7 or Vista. This process will likely work on Windows XP but has not been tested.

This will enable you to run all programs for the Mac Operating System on your PC.

Requirements

A laptop or desktop computer that supports virtualization (most newer computers do).
At least 1 GB of RAM (the more, the better).
VMware Player (virtualization software, you will need to create a free account).
Snow Leopard 10.6.2 (Operating System).
Snowy_VM.zip (extra files for installation).

Instructions

Update: A video detailing all these steps is now up:


Before you start, make sure that you have enabled Virtualization in the BIOS of your computer. This is usually disabled by default by computer manufacturers.

1. Unzip Snowy_VM and navigate to the following file: Snowy_VM\Snowy_VM\Mac OS X Server 10.6 (experimental).vmwarevm\Mac OS X Server 10.6 (experimental).vmx.

Double click this file, it will open VMware Player.

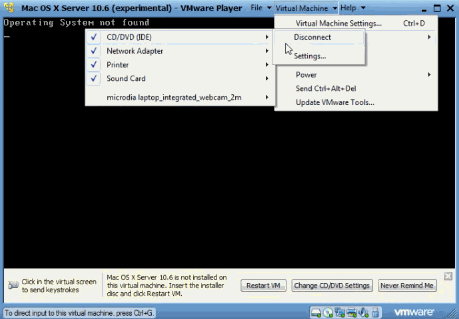
2. You should see a black screen now. On the blue VMware bar, press Virtual Machine > Virtual Machine Settings > CD/DVD > Settings.


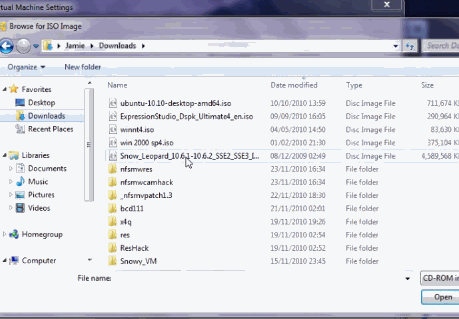
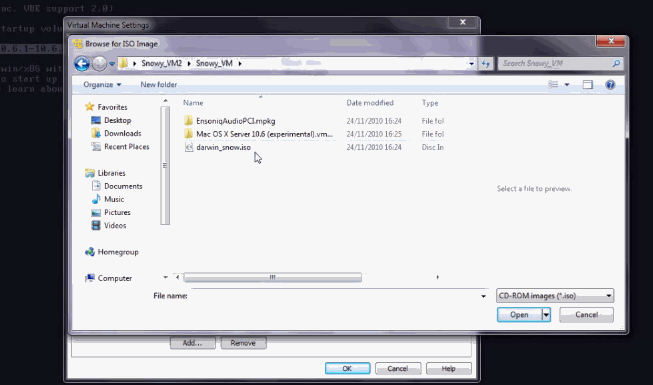
3. On the left, click Use ISO image file, then click Browse.

4. Now select the Snow Leopard 10.6.2 iso file downloaded from the torrent above. Press OK to close the box and return to the black screen.

 
5.  On the blue VMware bar, press Virtual Machine > Send Ctrl + Alt + Del. The machine will now boot up with the iso file. Once the text appears, press F8 on your keyboard.

This is the screen where you can enter in boot flags. Depending on your computer, you may have a different flag from another computer. Many computers have worked without boot flag, so try that first (just press Enter).

A gray screen will appear. In a few moments, a language box will appear. If it does, go down to step 6.

If this screen doesn't appear for 10 minutes you will need to enter a boot flag. Go to the blue VMware bar, press Virtual Machine > Power > Reset. Press F8 at the same screen again. Now enter -x -v busratio=20 cpus=1 arch=i386 -x32. If you get to the language screen, move to step 6.

If you still don't get the language screen, press Virtual Machine > Power > Reset. Press F8 at the same screen again. Now enter -v at the boot screen. This will allow you to figure out exactly where the problem is computer is freezing. You can then Google your error.

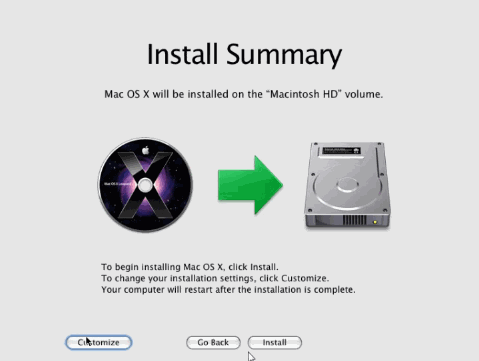
6. Follow the on-screen steps until you reach Install Summary.

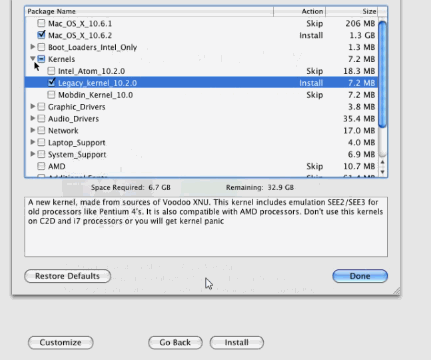
7. Here, click on Customize.


8. Select Mac OS_X_10.6.2. Under Kernels, select Legacy_kernel_10.2.0. Under Graphic_Drivers, select GraphicEnabler. Click Done.Click Install. This process should take around 10-15 minutes.


9. Once it's done, the count down from Step 5 will appear, press F8. Then on the blue VMware bar, press Virtual Machine > Virtual Machine Settings > CD/DVD > Settings.

10. Now go to Snowy_VM\Snowy_VM\darwin_snow.iso.


11. On the blue VMware bar, press Virtual Machine > Send Ctrl + Alt + Del.

12. Now wait until OS X 10.6.2 boots up! Just follow the simple setup instructions to create your user account and you'll be on OS X Snow Leopard. If the boot time is extremely long, go to the blue VMware bar, press Virtual Machine > Power > Power off. Then double click the name of your machine in the left column to start it up again.

13. When shutting down the machine, use the X in the top right corner or use the blue VMware bar, press Virtual Machine > Power > Power off.

14. Now to update to the latest OS X version, follow steps 2-4 on this guide:
http://techexxpert.blogspot.com/2011/04/updating-virtualized-os-x-1067.html

15. To enable an internet connection on the OS X machine, see this guide:
http://techexxpert.blogspot.com/2011/02/enable-internet-on-vmware.html

16. To enable sound and get a full-screen native resolution working see this guide: http://techexxpert.blogspot.com/2011/02/change-resolution-of-vmware-system.html